-
Products
-
Loudspeakers
- Atlas+Fyne IsoFlare™ Loudspeakers
- SHS Series
- In-Ceiling
- Surface Mount
- Pendent Mount Speakers
- IP Speakers
- Sound Masking Speakers
- Subwoofers
- Line Columns & Arrays
-
Speaker Components
- Speaker Drivers
- Transformers
-
Baffles & Back Boxes
- Blind Mount Enclosures
- EZ Mount Enclosures
- General Purpose Baffles
- Vandal Proof
- Q series
- Q Series - Square
- Recessed
- Torsion Baffles & Enclosures
- Cylindrical
- General Purpose Baffles - Square
- Recessed - Square
- Surface Mount Enclosures - Square
- Fire Rated
- 8" Speaker & Analog Clock
- Surface Mount Enclosures
- Mounting Rails
- Mounting Rings & Squares
- T Bar Bridge
- Portable Speakers
- Specialty Speakers
- Life Safety
- Horns
- Sound Masking
- Amplifiers
- GLOBALCOM® Enterprise Communication Ecosystem
- 5400 Series Life Safety Public Address System
- IP Solutions
- DSP / Signal Processors
- AC Power Distribution
- Racks and Cabinets
- Visual Displays
- Microphone & Mic Stands
- Classroom Audio Distribution
- Audio Accessories & Options
- Dante® Enabled Devices
- Buy America Act - Trade Agreements Act
- Discontinued Product
-
Loudspeakers
- Systems
- Industries/Markets
- Support
- Resources
- About Us
-
Products
-
Loudspeakers
- Atlas+Fyne IsoFlare™ Loudspeakers
- SHS Series
- In-Ceiling
- Surface Mount
- Pendent Mount Speakers
- IP Speakers
- Sound Masking Speakers
- Subwoofers
- Line Columns & Arrays
-
Speaker Components
- Speaker Drivers
- Transformers
-
Baffles & Back Boxes
- Blind Mount Enclosures
- EZ Mount Enclosures
- General Purpose Baffles
- Vandal Proof
- Q series
- Q Series - Square
- Recessed
- Torsion Baffles & Enclosures
- Cylindrical
- General Purpose Baffles - Square
- Recessed - Square
- Surface Mount Enclosures - Square
- Fire Rated
- 8" Speaker & Analog Clock
- Surface Mount Enclosures
- Mounting Rails
- Mounting Rings & Squares
- T Bar Bridge
- Portable Speakers
- Specialty Speakers
- Life Safety
- Horns
- Sound Masking
- Amplifiers
- GLOBALCOM® Enterprise Communication Ecosystem
- 5400 Series Life Safety Public Address System
- IP Solutions
- DSP / Signal Processors
- AC Power Distribution
- Racks and Cabinets
- Visual Displays
- Microphone & Mic Stands
- Classroom Audio Distribution
- Audio Accessories & Options
- Dante® Enabled Devices
- Buy America Act - Trade Agreements Act
- Discontinued Product
-
Loudspeakers
- Systems
- Industries/Markets
- Support
- Resources
- About Us
- HOME /
- Transportation Resources /
- User Groups and Support /
- Tips & Tricks /
- Configuring the Cisco SPA 502G to work w/ IED PBX
Configuring the Cisco SPA 502G to work w/ IED PBX
Configuring the Cisco SPA502G phone
The configuration is comprised of two parts- on-phone configuration, and browser-based configuration.
On-Phone
- Plug in the SW port on the phone and wait for it to power up. Note that this phone requires PoE.
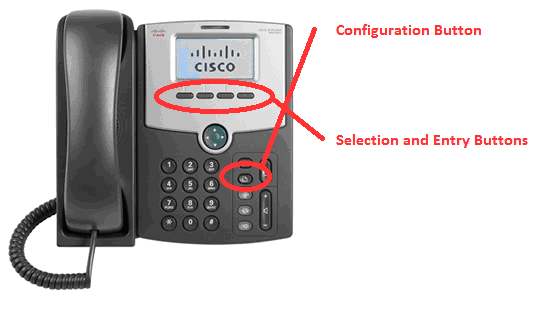
- Press the Configuration Button. Refer to Figure 1.

Figure 1 - SPA502 Phone
- Use the Arrow Keys to select option 9 “Network”. Press “select”.
- Arrow down to select option 1: “WANConnection Type”. Press “edit”.
- Press “option” until “Static” is displayed. Press “ok”.
- Use the Arrow Keys to select “Non-DHCP IP Address”. Press “edit”
- Enter the static IP address for the phone. Use the star key for “.” When finished, select “ok”.
- Use the Arrow Keys to select “Non-DHCP Subnet Mask”. Press “edit”.
- Enter the netmask for the phone. Use the star key for “.” When finished, select “ok”.
- Press “save”.
- Use the Arrow Keys to select “CDP”. Press “edit”.
- Change the CDP setting to “No”
- Press “save”.
- Use the Arrow Keys to select option 12 “Reboot”. Press “select”. When asked to confirm, select “ok”.
Browser
Once the phone is rebooted, Open a browser to the IP address entered in Step 7 above.
- In the upper left corner, select “Admin Login”. After the screen refreshes, select “Advanced”.
- Select the “Voice” tab. When the screen refreshes, select the SIP tab. Change the RTP packet size to 0.020.
- Select the “Ext1” tab.
- Enter the following changes:
|
Setting |
Value |
|
Proxy |
IP Address of PBX |
|
Display Name |
101 |
|
User ID |
101 |
|
Password |
101 |
|
Preferred Codec |
G722 |
|
Use Pref Codec Only |
Yes |
|
Second Preferred Codec |
G711u |
|
DTMF Tx Method |
Match to IED System. Choose “AVT” if IED SIP Services are set to “RFC2833”, or “INFO”. |
- Press “Submit All Changes” The phone will reboot.
- Verify that the phone registers in the PBX. PBX information is outside the scope of this document.
- Call another registered extension in the PBX to test audio, hangup and DTMF.


